DIY sundials offer a fascinating way to connect with the natural world and understand the passage of time. A sundial is a simple yet ingenious device that uses the position of the sun to tell time, relying on the basic principles of astronomy and geometry. From ancient civilizations to modern-day enthusiasts, sundials have captivated people for centuries, serving as both practical timekeepers and artistic expressions.
Creating a DIY sundial is a rewarding project that allows you to delve into the history of timekeeping, learn about the mechanics of the sun’s movement, and enjoy the satisfaction of building a functional device. Whether you’re a seasoned crafter or a curious beginner, this guide will provide you with the necessary information and steps to design, construct, and calibrate your own sundial.
Designing a DIY Sundial

A sundial is a simple yet fascinating instrument that tells time by tracking the position of the sun in the sky. Designing and building your own sundial is a fun and educational project that can be enjoyed by people of all ages. This section will guide you through the process of designing and constructing a sundial.
Tools and Materials Needed
The tools and materials required for building a sundial are readily available and inexpensive. Here’s a list of what you’ll need:
- A flat, sturdy base (wood, plastic, or stone)
- A straight stick or rod (for the gnomon)
- A protractor or compass
- A ruler or measuring tape
- A pencil or marker
- A drill (optional, for attaching the gnomon)
- Glue or screws (optional, for attaching the gnomon)
Designing the Sundial
The design of a sundial depends on the location where it will be used. The angle of the gnomon, which casts the shadow, needs to be adjusted to match the latitude of your location. Here’s a step-by-step guide to designing a sundial:
- Determine Your Latitude: Use an online tool or a map to find the latitude of your location. This is crucial for accurately setting the angle of the gnomon.
- Choose a Base: Select a flat, sturdy base for your sundial. The size of the base will depend on the size of the sundial you want to build. For a smaller sundial, a piece of wood or plastic will suffice. For a larger sundial, you might consider using a stone or concrete slab.
- Mark the Center: Use a ruler or measuring tape to mark the center of the base. This point will be the center of your sundial.
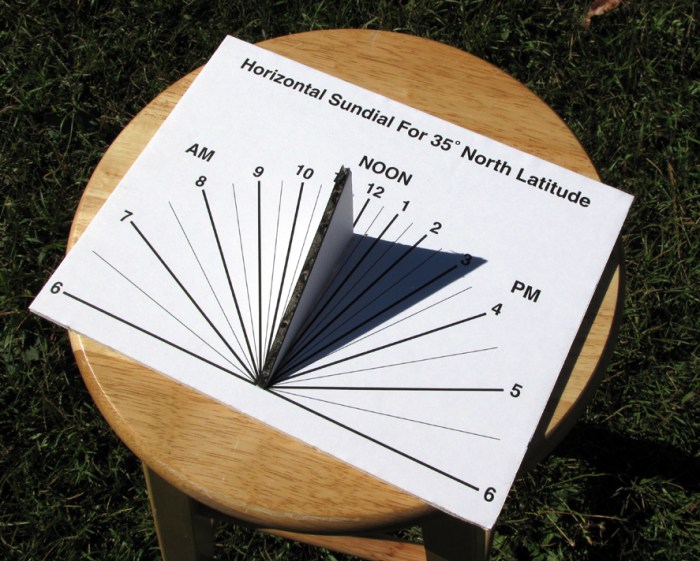
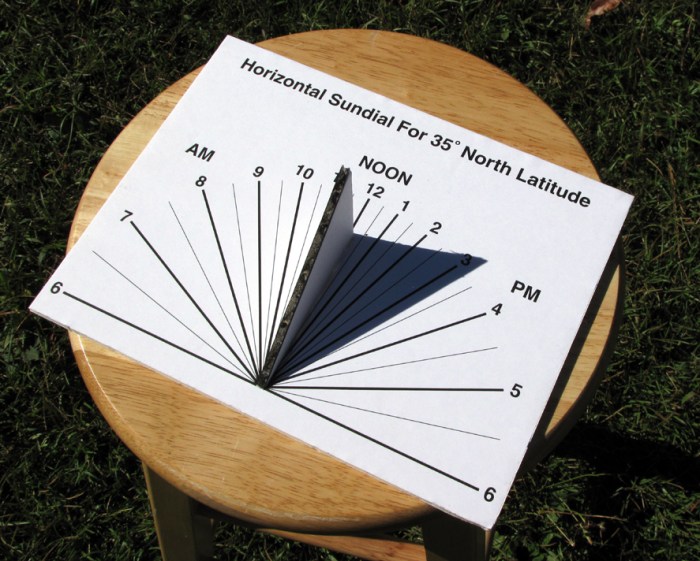
- Draw the Hour Lines: Using a protractor or compass, draw lines radiating outward from the center of the base. These lines represent the hours of the day. The angle between each hour line depends on your latitude.
The angle between each hour line can be calculated using the formula:
Angle = 15° * (Hour – 12)
Where ‘Hour’ is the hour of the day (1-12).For example, at a latitude of 40° North, the angle between the 10 am and 11 am hour lines would be 15° * (10 – 12) = -30°. You would draw a line at 30° from the center, going towards the west (since it’s before noon).
- Position the Gnomon: The gnomon is the stick or rod that casts the shadow. Its angle needs to be adjusted to match your latitude. The gnomon should be positioned at the center of the base and tilted upwards at an angle equal to your latitude.
For example, if your latitude is 40° North, the gnomon should be tilted upwards at a 40° angle.
Constructing a DIY Sundial
Now that you have your materials and have determined the appropriate location for your sundial, it’s time to assemble it. The process is straightforward and can be done with basic tools.
Assembling the Sundial
The key to assembling your sundial is ensuring the gnomon is positioned at the correct angle. This angle should correspond to your latitude, determining the sundial’s accuracy.
- Mark the gnomon’s base: Using a protractor, mark the desired angle on the gnomon’s base. The angle should correspond to your latitude. For example, if your latitude is 40 degrees north, you would mark a 40-degree angle on the gnomon’s base.
- Secure the gnomon: Attach the gnomon to the base of the sundial. Ensure that the marked angle is facing the direction of true north. You can use glue, screws, or any other method that securely holds the gnomon in place.
- Mark the hours: Using a compass, orient the sundial so that the gnomon points towards true north. Mark the hours on the sundial’s face, starting with 6 am on the left side and 6 pm on the right side. The hours should be spaced evenly throughout the day.
- Adjust for daylight saving time: If you live in a region that observes daylight saving time, you can adjust the sundial by shifting the hour marks by one hour.
Ensuring Accuracy
A sundial’s accuracy depends on several factors, including the precision of the gnomon’s angle and the orientation of the sundial. Here are some tips to ensure accuracy:
- Use a compass: A compass is essential for aligning the sundial with true north.
- Check your latitude: Double-check your latitude and ensure the gnomon’s angle is accurate.
- Calibrate the sundial: After assembling the sundial, it’s essential to calibrate it by comparing it to an accurate clock. Make adjustments to the hour marks if necessary.
A well-constructed sundial should provide a fairly accurate reading of the time. However, keep in mind that a sundial is only accurate for the location where it was constructed. If you move the sundial to a different location, you’ll need to recalibrate it to match the new latitude.
Using a DIY Sundial
Once your sundial is constructed, you can start using it to tell time. However, it’s essential to understand how to read the time on a sundial and the limitations of this ancient timekeeping device.
Reading the Time on a Sundial, Diy sundial
To read the time on a sundial, you need to align the gnomon with the North Star. The gnomon is the shadow-casting part of the sundial, usually a vertical rod or a triangular piece of metal. The shadow cast by the gnomon will fall on the sundial’s face, which is marked with hour lines. The time is indicated by the hour line where the shadow ends.
Limitations of Sundials
Sundials have several limitations, making them less accurate than modern clocks.
- Weather Conditions: Sundials are not effective in cloudy or overcast weather as they rely on sunlight to cast a shadow.
- Daylight Hours: Sundials can only tell time during daylight hours. They cannot be used at night or during periods of darkness.
- Seasonal Variation: The angle of the sun in the sky changes throughout the year. This means that a sundial needs to be adjusted for different seasons to provide accurate time.
- Location: Sundials are designed for a specific latitude. They need to be adjusted if they are moved to a different location.
Practical Applications of Sundials
Despite their limitations, sundials still have some practical applications:
- Educational Tool: Sundials can be a valuable tool for teaching children about time, the movement of the sun, and the concept of latitude.
- Decorative Element: Sundials can be a beautiful and unique decorative element in gardens, courtyards, or homes.
- Back-up Timekeeping: In emergency situations where power is unavailable, a sundial can provide a basic way to tell time.
Creative Sundial Designs: Diy Sundial

Sundial designs are not limited to the traditional flat, horizontal style. With a little creativity, you can create unique and artistic sundials that add a touch of beauty and functionality to your outdoor space.
There are many ways to get creative with sundial designs. You can experiment with different materials, shapes, and sizes. You can also incorporate sundials into landscaping or architecture.
Artistic Sundial Designs
Artistic sundials are a great way to express your creativity. You can use sundials as a canvas for your artwork, incorporating them into sculptures, mosaics, or other art forms.
- Mosaic sundials: These sundials are made using small pieces of tile, glass, or other materials. They can be designed to create intricate patterns or images.
- Sculptural sundials: Sundials can be incorporated into sculptures, adding a functional element to the artwork. For example, a sundial could be built into the base of a statue or incorporated into a garden sculpture.
- Painted sundials: You can paint sundials on walls, rocks, or other surfaces. This is a great way to add a touch of color and personality to your outdoor space.
Incorporating Sundials into Landscaping or Architecture
Sundials can be incorporated into landscaping or architecture in a variety of ways. This can add a unique and functional element to your outdoor space.
- Garden sundials: You can place sundials in your garden, using them as focal points or incorporating them into flower beds or walkways.
- Architectural sundials: Sundials can be incorporated into the design of buildings, such as on rooftops, walls, or even on the ground.
- Water feature sundials: You can create a sundial using a water feature, such as a fountain or pond. The water can act as the gnomon, casting a shadow on a surrounding surface.
Constructing a DIY sundial is a journey of discovery, combining history, science, and creativity. As you learn about the principles of sundials, you’ll gain a deeper appreciation for the sun’s role in our lives and the ingenuity of ancient timekeeping methods. The process of designing, building, and calibrating your own sundial will be both educational and enjoyable, leaving you with a unique and functional piece that you can cherish for years to come.
Building a DIY sundial is a fun and educational project that can teach kids about the passage of time and the movement of the sun. If you’re looking for other outdoor activities to engage children, consider exploring playground ideas diy which can provide hours of entertainment and physical activity. A DIY sundial can be a great addition to your backyard playground, providing a unique and educational element for kids to enjoy.


